Visual Meringue - A mouth-watering taste of all things creative…
About
Home & Garden
    bathrooms
    bedrooms
    dining room
    entryway
    Family Room
    Garden
    guest room
    kitchen
    laundry
    Living Room
    office
    rec room
DIY & Crafts
    art
    crafts
    floral arranging
    free printables
    furniture
    home upgrades
    kids
    organization
    paint & stain
Chef Kev (eats)
    Drinks
    Mains
    Salads
    Soups
    Sweets
photography
Seasonal & Holiday
    spring
    Summer
    Autumn
    Winter
    Valentine's Day
    easter
    Canada Day
    Halloween
    Thanksgiving
    Christmas
Visual Meringue - A mouth-watering taste of all things creative…
  • About
  • Home & Garden
    • bathrooms
    • bedrooms
    • dining room
    • entryway
    • Family Room
    • Garden
    • guest room
    • kitchen
    • laundry
    • Living Room
    • office
    • rec room
  • DIY & Crafts
    • art
    • crafts
    • floral arranging
    • free printables
    • furniture
    • home upgrades
    • kids
    • organization
    • paint & stain
  • Chef Kev (eats)
    • Drinks
    • Mains
    • Salads
    • Soups
    • Sweets
  • photography
  • Seasonal & Holiday
    • spring
    • Summer
    • Autumn
    • Winter
    • Valentine’s Day
    • easter
    • Canada Day
    • Halloween
    • Thanksgiving
    • Christmas
Food & Drink, Salads

What a Turkey!

March 7, 2013 by Elaine No Comments

Chef Kev is such a magic genius when it comes to going through the fridge and coming up with something delicious on the fly. Want proof? Well, take this mouth-watering salad topped with ground turkey and chorizo for instance? Bam. Told ya. Right off the top of his head. Lucky me 🙂

The ruffage portion is made up of the following:
– greens mixture (spinach and spring mix)
– shelled, cooked edamame
– diced shallots
– chopped orange pepper

To make the turkey and chorizo topping you:
Brown the turkey by cooking it in a bit of olive oil over medium-high heat. Once browned, drain the excess fluid from the pan and add in some minced shallot, a minced garlic clove and some diced fresno pepper. Then add in some diced dry chorizo sausage and cook a few minutes more.

Next, add some worcester sauce and ‘better than bouillon’ beef bovril. Mix the bouillon with about 1/2 cup of warm water first to dilute it. Add to pan.

Let that reduce down and when almost finished, add in a few spices. Chef Kev used ‘Jaime Oliver Szechuan Pepper’ (szechuan pepper, chilli, ginger salt) and Paella Seasoning (salt, pepper, paprika, garlic, thyme, nutmeg, parsley, saffront).

Then, add a small scoop of the bovril (this time undiluted), mix in and let reduce down.

Plate your salad and add your turkey and chorizo mixture to the top. Dress with your favourite balsamic dressing and finish with fresh grated pecorino romano cheese.

Enjoy!

Share:
Food & Drink, Home & Garden, kitchen, Uncategorized

Oil & Vinegar Lazy Susan

March 6, 2013 by Elaine No Comments

Chef Kev loves to have all his cooking essentials close at hand and I love to organize so basically, a marriage (pun intended) of the two was bound to happen…

Now, the ‘before’ wasn’t a horrible mess, but did make my need-for-things-to-be-tidy-and put-away problem a little nuttier.

 
But then I remembered that we had been given this as a Christmas present years ago.
 
 
We do use it, but not daily of course, so I stole the lazy susan component from the box! Come on out Suzy!
 
 
Then I gave the bottles a good clean and loaded them on…


And a few minutes later I had a nice and organized oil & vinegar collection!
 
I love it when a plan comes together…
 
Especially when the plan spins! Weeeeeeee! ….
 
 
What about you? Any quick and easy updates around your home? I know I’m not the only one out there who likes things all nice and tidy so ‘dish’. See how I did that? Cooking, kitchen, dish? Ah, never mind.
 
 
Share:
Uncategorized

March Calendar Roundup

March 1, 2013 by Elaine No Comments
March is one of my favourite months! Why? Because my birthday is this month! It also happens to be the birthday month of my little guy Chace, my dad, my father-in-law, my brother-in-law… AND my aunt (who shares the same birthday as me). And now that I think about it, I have quite a few friends who share this birthday month too… wowza, this is a busy month!

Here is the collection of desktop calendars that caught my eye for March. Simply click on the link below the one you like to be redirected to the download.

Oana Befort
The Lovely Dept.
Caroline Johansson
Studio of Mae
Nicole’s Classes


Happy Serendipity


Jennifer Squires


Foxy Photography
Virginia and Charlie
Handmade Success
Marimekko

Which is your fave? Don’t forget to leave a note for the fabulous artists and photograhers if you download one (optional of course but nice no?). And if you happen to make a desktop calendar and would like it considered for my monthly roundup please drop me an email or comment below. Would love to hear from you!

Share:
easter, Home & Garden, Seasonal & Holiday, spring

Here comes Peter Cottontail

February 27, 2013 by Elaine No Comments

With Valentine’s Day over, I turned some Springy attention to my mantel. Time to show it some bunnyish love (minus actual bunnies).

I don’t normally make my ‘Spring mantel’ so Eastery but with my little guy taking more notice of the decorating I do these days (he’ll be four at the end of March) I though it was high time to tap back into my inner child and pull the proverbial rabbit out of the hat.

I didn’t really have a set vision in mind (as you will see later) but one of the main jumping off points was the (always great) seasonal subway art from Eighteen 25. You can see all of their amazing creations here, and how I used their Christmas one here and Fall one here. So fun.

I placed some eggs in a green tin I had on hand, a nice way to nod to Easter without getting all baskety and raffiafied.

To play off the pinks in the subway art I used one of my favourite candle holders (bought a few summers ago for my back deck). I still think the ‘legs’ look like stiletto heels 😉

The white candle holder is one I’ve had for years. It houses a large pillar candle and projects a neat ‘swiss cheese’ pattern when lit. I thought it complimented the ‘spring’ look well. Nice and light and airy.

The pink bowl in the background was a gift from my parents. I placed some cotton branches and little wicker decorative balls in it.

To frame the subway art I used a frame I had (originally painted for my Christmas mantel a few years back) and mounted the art on some wrapping paper I had. I love the crisp green – very Easter like in my opinion.

And a photo of it all put together again for you… You can also see the white ceramic bark vases far left. I got those in the Fall and have been using them non-stop ever since. You can see them in use here, here and here.

Clean and simple. Just the way I like it. 
And since I like to challenge myself to see if I can figure things out, I took a video of the whole thing and time-lapsed it (so you can see my 27 different variations before I decided on this one – if that’s your kind of jam). But warning, this video holds absolutely no educational value and is probably not going to get any high marks for entertainment value either. Definitely no Oscars for this little piece of confusion. But I had fun doing it (that’s all that counts right?)

What about you? Ready for the Easter Bunny yet? Any Spring mantels that you’d like to share? I’m all ears (ha, pun intended).

Linking to:
The DIY Dreamer
The Style Sisters
This Silly Girl’s Life
Housewife How-To’s
Liz Marie
Serenity Now
Craftberry Bush
The Shabby Nest
Chic on a Shoestring Decorating
A Jennuine Life

Share:
DIY & Crafts, kids

What’s in a name?

February 25, 2013 by Elaine No Comments

A really good friend of mine had a sweet little baby boy on Thursday. When she told me his name – Evan – I immediately saw some interesting typography in my mind, so later that evening I whipped up a little art gift before I forgot it.

The process was simple enough to do in my graphic design program (Adobe Indesign). First I made a block of colour (background) which was 7″ x 5″. I chose a warm gray (Pantone Warm Gray 5), then I typed the words “LOVE” and “EVAN” in a font named “Cabin” at 125 pt. (a free font that can be downloaded here).  I overlapped the last two letters of ‘love’ and the first two of ‘Evan’ and set the ‘Evan’ font block to “multiply” in the effects palette.  I then set an opacity of 46%. And for those wondering, the colour I used for ‘Evan’ is Pantone 322.
Then I typed “the sweetest little baby boy…” below it in the font ‘Bickley script’ (download from here) and set the colour to “Pantone Cool Gray 11”.
This is just how I did it of course, you can get the same affect through Photoshop or other programs that have some design capability.
The neat thing about the typography in this gift is that the last two letters of the word ‘love’ are reflected in Evan’s name. (i.e. in ‘love’ we end with ‘ve’ but in ‘Evan’ we start with the opposite arrangement ‘ev’).
Here are a few other examples of how you could play with something like this: SPECIAL and LAYLA – see how ‘special’ ends with ‘al’ and then ‘Layla’ start with the opposite ‘la’. Or, how about LOVE with EVIE, EVA, or even EVELYN. Or, JOY and YOLANDA. SWEET and TEAGEN, PURE and ERIN, or (my fave) LOVEABLE and ELAINE (ha!). See, the possibilities are endless!
Here is a better look at the the script line…
To frame it, I used a white frame with an interesting wood grain detail.
I got to meet baby Evan this weekend and give him a lot of cuddles. Mommy and Daddy enjoyed this gift and hopefully one day when he’s old enough, little Evan will too.
What did you get up to this weekend? Any highs from ‘new baby smell’? Any impromptu artwork projects? Regardless, I hope it was a nice one. Have a good week all!
Linking to:
The DIY Dreamer
The Style Sisters
This Silly Girl’s Life
Housewife How-To’s

Liz Marie
Serenity Now
Craftberry Bush
The Shabby Nest
Chic on a Shoestring Decorating
A Jennuine Life

Share:
DIY & Crafts

Don’t be fooled by the rocks that I got…

February 22, 2013 by Elaine No Comments
… Jenny from the block I’m not.
But I DO have some new sparkle! This post is all about jewellery upcycling yo.
 
I’ve been meaning to do this for years. A long time. Are you with me when I say I had a super stylin’ Ziploc full of battered jewellery that needed some lovin? You know your fave pieces that break, go out of style, wear out or just get generally dingy? 
It’s like that orchid you received as a gift in 2008 that you accidentally killed yet you still hold on to it in case it comes back? Well, I’d like to introduce you to my orchid.


So much potential… Let’s get to fixin’ and revamping these pieces shall we? All you need is a bit of imagination and a few sets of pliers and wire snips as seen above.
This first upcyle was made from the chain of a broken necklace that I owned and a necklace that my friend (she’s a manager at a accessories store) gave me as a hand-me-down (#thanksKaelayourock). I’ve lucked out many times getting things she no longer wants (score for me). Some I wear as is, but others have made it to my pile above for the reasons mentioned.
 This piece was actually inspired but one of my favourite Stella and Dot necklaces.
This next one was from a necklace that my neighbour gave me. It was hers, but she wasn’t wearing it. She asked if I wanted it as I tended to wear chunkier pieces than her so I gladly accepted! The only problem was it hung at a weird length for me so I didn’t tend to use it. But then I had an idea…
I love the double strand chain.
This next one was a simple revamp of one of my favourite necklaces. I adore the rose clasp and used to wear this all the time. The chain had worn down and due to loosing it’s finish tended to kink and roll on itself. I noticed in the multi-chain hand-me-down from my store manager buddy that there was a chain that I could use to bring my favourite necklace back to life! I know the multi-chain necklace looks really pretty from this far view but unfortunately when you got up close you could see that some of the strands and overall condition had seen better days.
Moving along I made a new necklace out of a silver chain I had. The pendant was originally a white flower but had started to degrade and yellow. The leaf was actually an earring! I had lost the other one but loved it so much that I kept it thinking it would made a great pendant. I also used a piece of chain I had on hand to make an ‘extender’.


If you follow me on instagram or Facebook, you may have seen this ‘sneak peak’ on Tuesday…
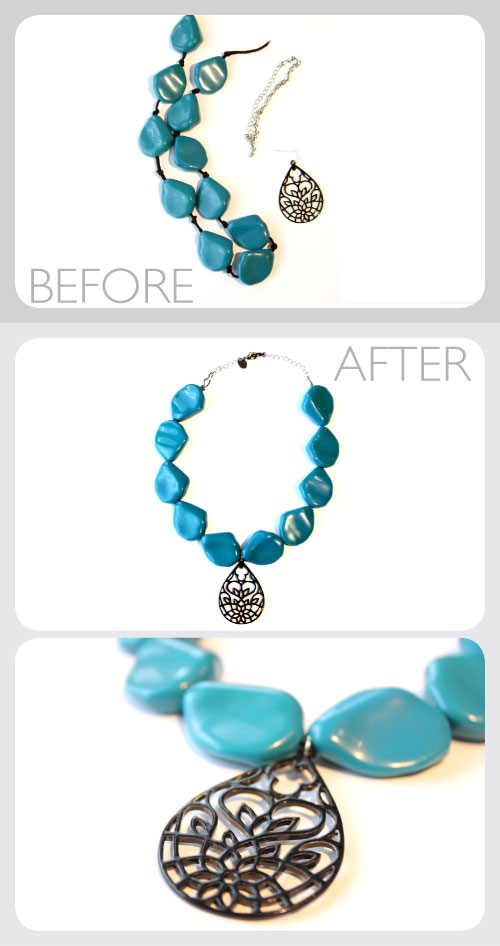
This is one of my favourites. The chunky teal necklace was a hand-me-down from the same neighbour who gave me the gold and orange one above. It came on a brown suede rope and the beads had a simple knot between them. The suede broke one day and so I revamped it into this new piece, adding yet another orphaned earring as the centrepiece. I also added an extender to this necklace too from another fragment of chain that I had.

This is so fun!
Okay, moving along. This next one combined two strands of pearl from the multi-strand necklace, as well as a link from the gold/orange one and a little cluster that had broken free of the chain used above in Stella and Dot inspired piece.

This last necklace again used a few strands from the multi-strand necklace along with a few gray beads from another one and the clasp from a bracelet. Again, all hand-me-down pieces.


I also had a charm bracelet but the charms weren’t really my ‘look’. So I simply removed them creating a new cleaner look that was much more ‘me’.
And this last little one is more of a ‘tip’ should you have any pieces in need of the same help. I have this adorable ring (again, thanks Kaela) but one of the little ‘diamonds’ fell out. I simply dabbed a small bit of white nail polish into the recess and now the little discrepancy isn’t so noticeable!
So there you have it. Nine ‘new to me’ or refurbished pieces of jewellery that come in at a bank busting total of zero dollars spent. Now that’s my kind of shopping 😉
What about you? Any jewellery surgery as of late? And ridiculously generous friends and neighbours who shower you with hand-me-downs? If nothing else, you now know another use for nail polish aside from fixing tears in your pantyhose!
And that makes a good day doesn’t it? TGIF friends!


Linking to:
Design, Dining and Diapers
Serenity Now
DIY Dreamer
Shabby Nest
Fingerprints on the Fridge
Chic on a Shoestring Decorating
The Style Sisters
This Silly Girl’s Life
A Jennuine Life
Share:
Page 15 of 28« First...10«14151617»20...Last »

Hello

I'm Elaine. A graphic designer, mommy, wife and blogger. I have trouble sitting still and am always looking for a project. Follow along as I post about life – in a pretty and creative way of course.

Categories

Archives

My Instagram

All content © Visual Meringue / All rights reserved